Homemade jukebox
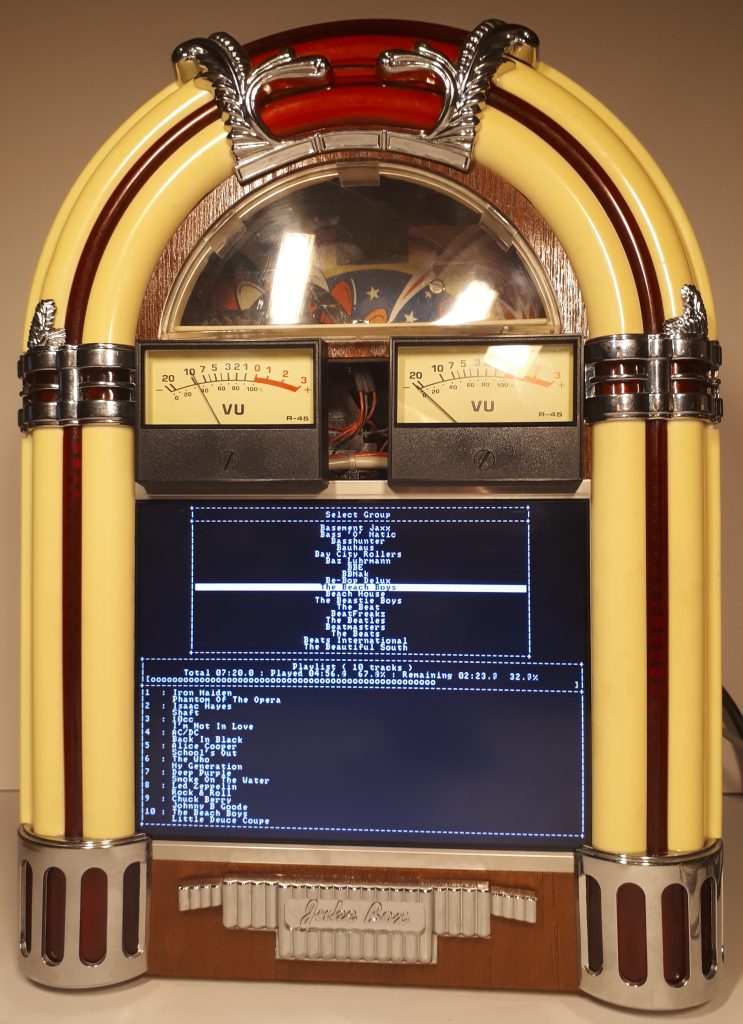
Table of Contents
Who wouldn’t want their own jukebox?
When I lived at my parents house, I had my own Hi-Fi and played a lot of music on records, tapes and CD’s. When I finally got my own house, my usage of my Hi-Fi got less and less. I wanted something more automated to play me lots of music. MP3’s had only been around for a short number of years and there were not many products to play them like there are now. I was looking towards some sort of jukebox.
There were CD jukeboxes that could be part of your Hi-Fi separates system and you could load them up with a few hundred CD’s and then play them to a predefined or random order. I mulled over this idea, but I never purchased one.
I have always liked the idea of a full sized jukebox, but I just did not have the room in my house to have one. Vintage ones would only take vinyl records and modern ones that took CD’s cost the earth. The only choice I had was to build my own jukebox.
What would my jukebox look like?
I started to mull over lots of different ideas on how I wanted to do this. By now MP3’s were getting more popular and Mini-ITX motherboards were making an appearance. So this seemed to be the way I would go. I just needed to work out what I was going to house this all in. I did not want to just have a bland metal box, and I wanted it to look interesting.
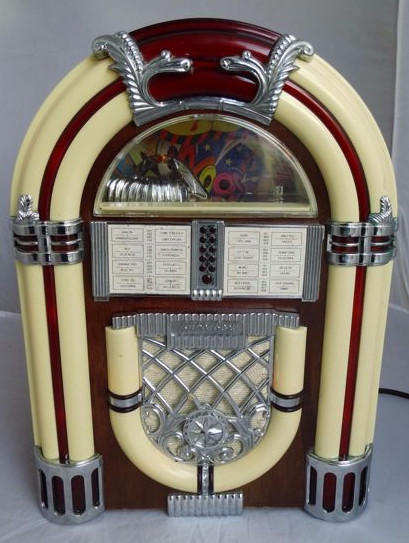
Whilst poking around on eBay, I came across a 1980’s radio cassette player that was in the shape of an old Wurlitzer jukebox. It was very small at 36cm tall and would sit on a table top easily. As portable radio cassette players were not really in demand anymore, I was able to buy this for about £20.
This saved me a lot of time as I did not need to make the enclosure myself and would just need to work on the inside.
Initial work
The first thing to do was to gut all the redundant internal parts. Luckily this was dead easy and it was all out in no time. I now had an empty case to work with.
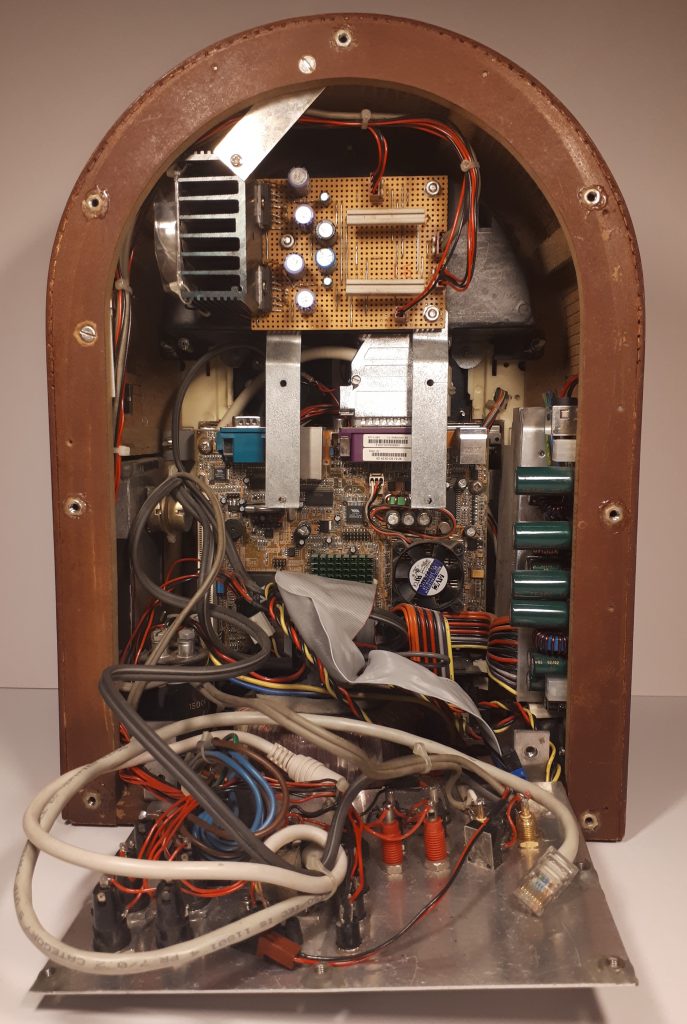
I purchased a Mini-ITX motherboard and VIA ones were very popular at the time. They were not particularly powerful, but they were cheap and very low power. It has a soldered CPU and all of the PC components are on board as well. So you just need to add some RAM, a hard drive and a power supply and you are all set. Luckily the Mini-ITX motherboard was practically a perfect fit inside the jukebox case and I just had to make some brackets to mount it. I got a mini power supply for it and this was much smaller than a normal PC power supply.
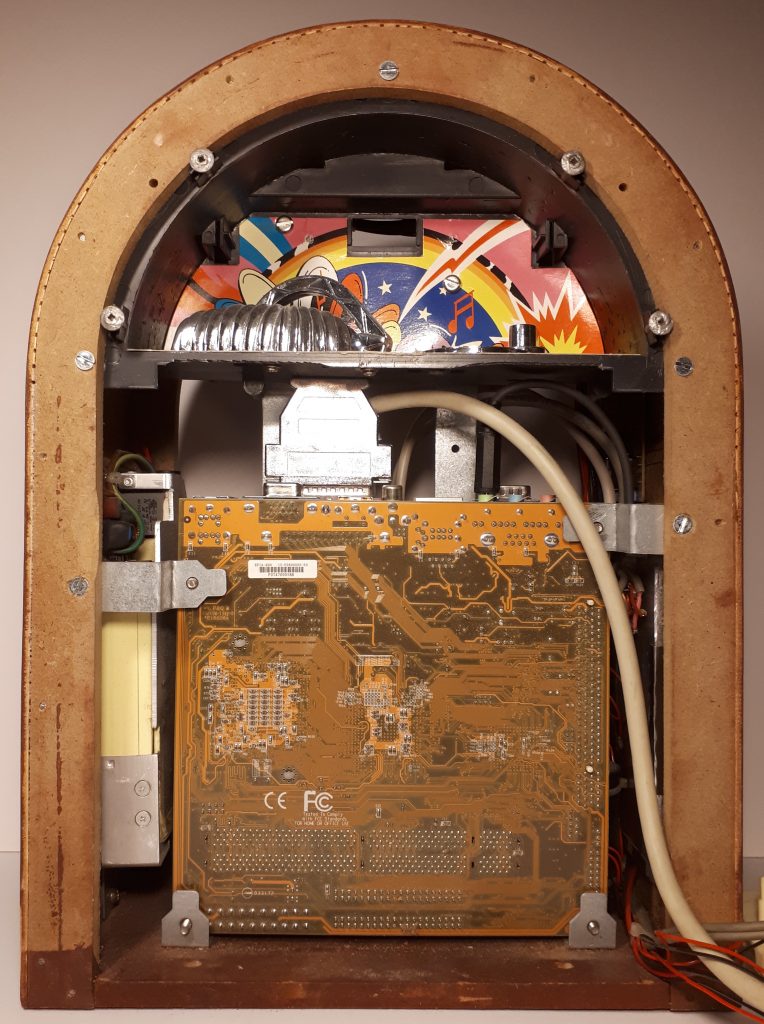
The next problem was going to be the screen. I was adamant that the screen would be internal to the jukebox case. Luckily there were loads of cheap Chinese LCD VGA screens available on eBay for about £100. I found one that was just the right size and fitted the front of the jukebox once I had modified it. This involved removing the LCD panel from its plastic enclosure.
As I am a Linux fan, I loaded this onto the hard drive and I now had a mini PC that would power up and boot its operating system. I felt I was halfway there.
Now I just need some sound
This jukebox was never going to have internal speakers. I wanted it to drive regular external Hi-Fi speakers so they can produce a decent output.
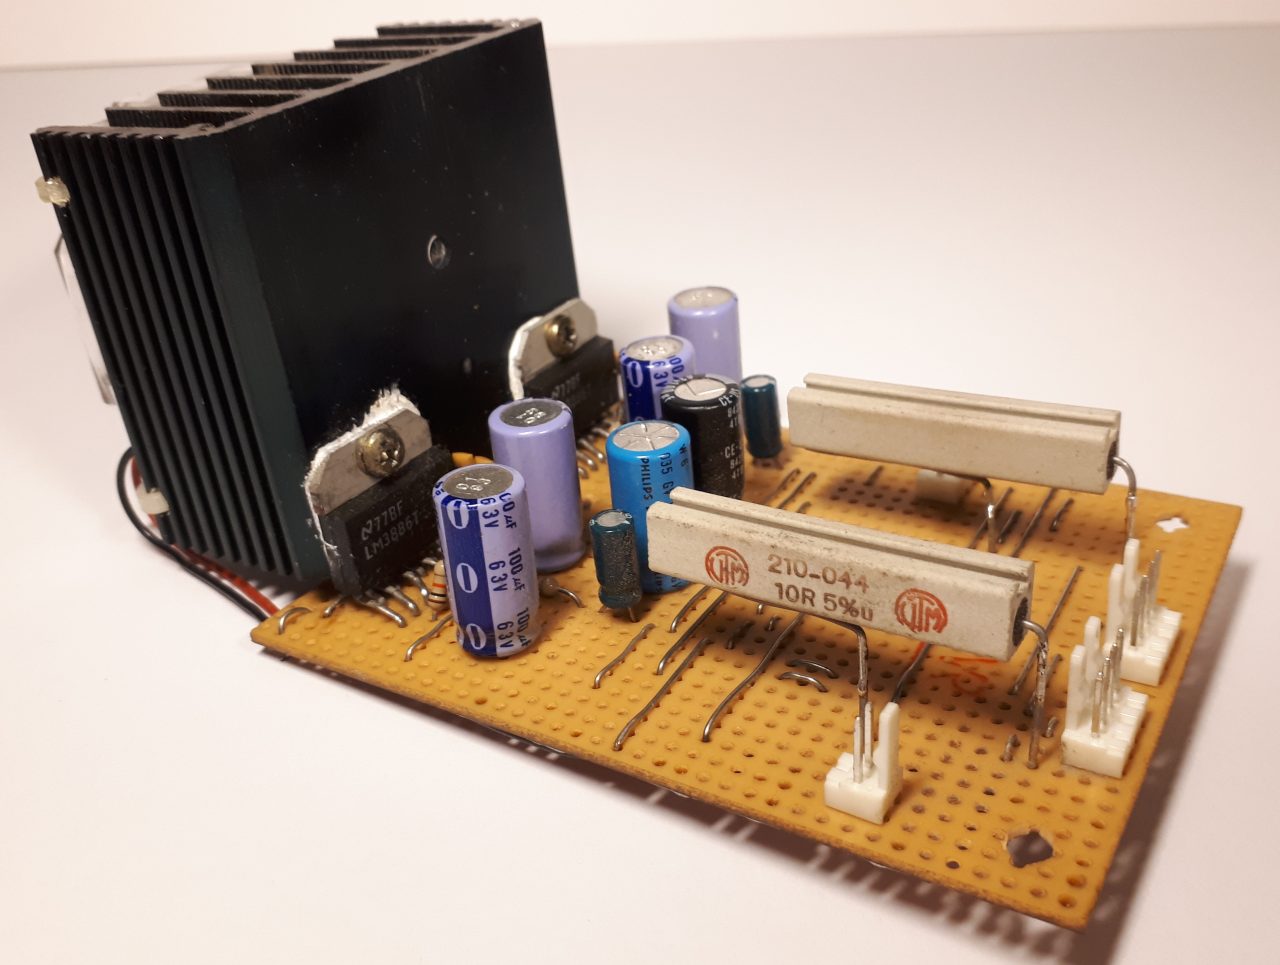
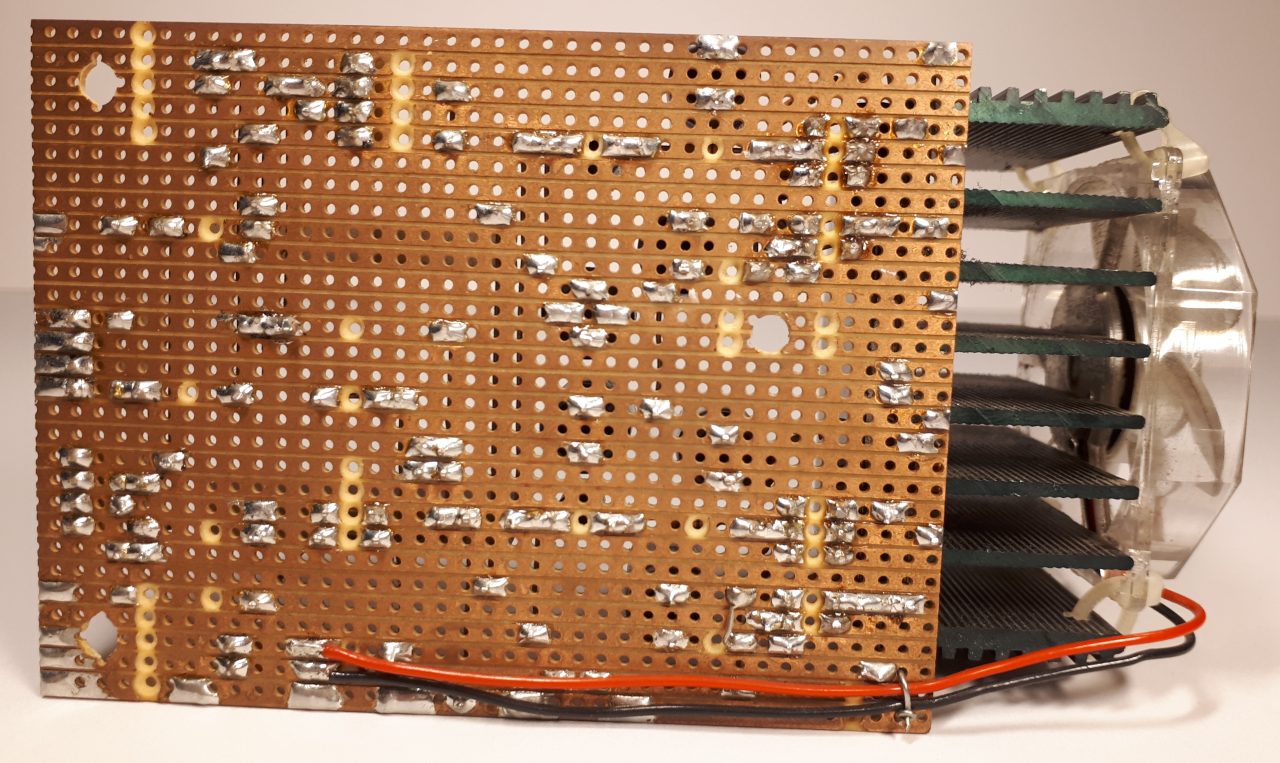
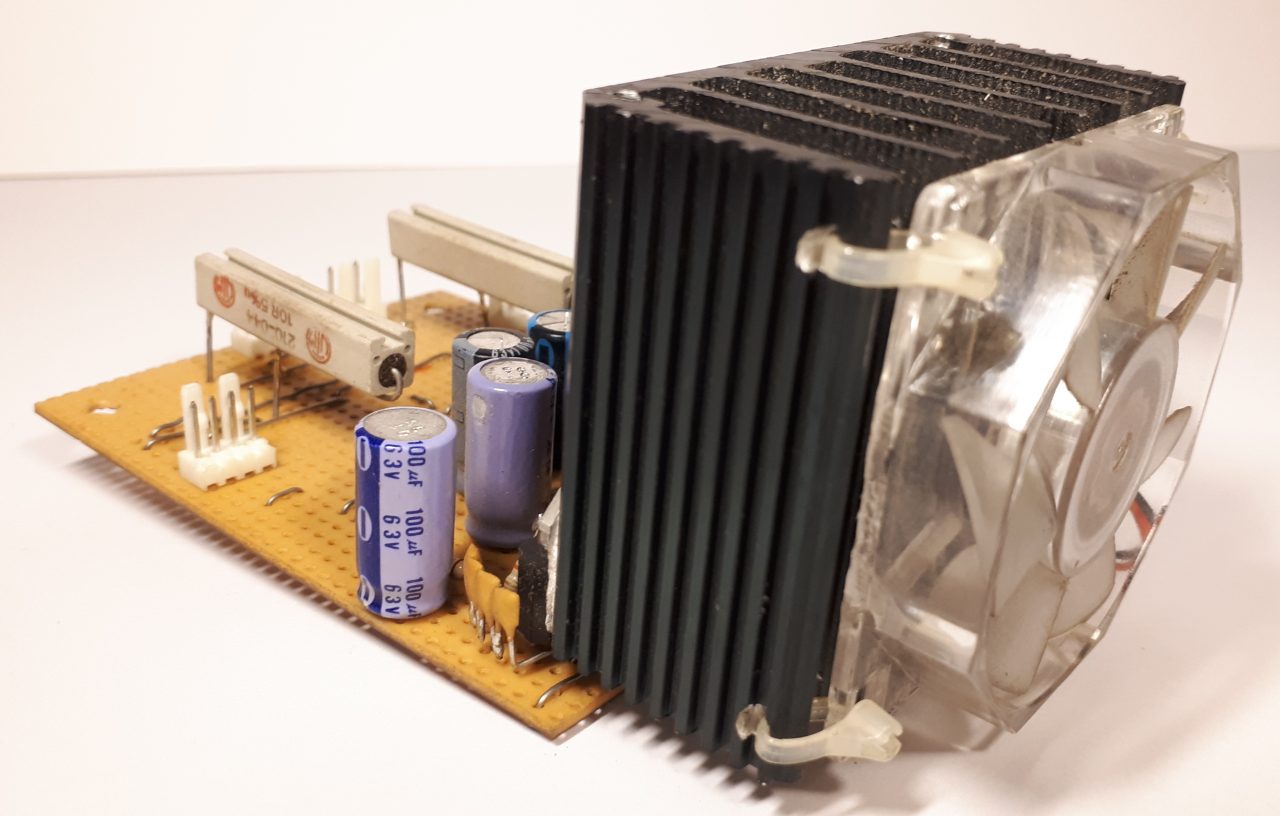
I needed an amplifier to run these speakers. After looking at lots of kits and not really seeing anything that I wanted, I decided to make my own. A quick way to make a fairly decent cheap amplifier is to use a special integrated circuit which does most of the work. I selected the LM3886T and this just needs a bunch of passive components to complete the circuit. These chips are mono amplifiers and for stereo output I will need to use two of them. I built it on strip board and it is fairly simple. The integrated circuits needs a heat sink to keep them cool and I added a small CPU fan for good measure.
To allow this amplifier to make some decent power, I needed a fair power supply voltage. I used quite a large toroidal transformer, and this gave me about +30v and -30v. Unfortunately this made the jukebox quite heavy, but I think it is worth it for the power output.
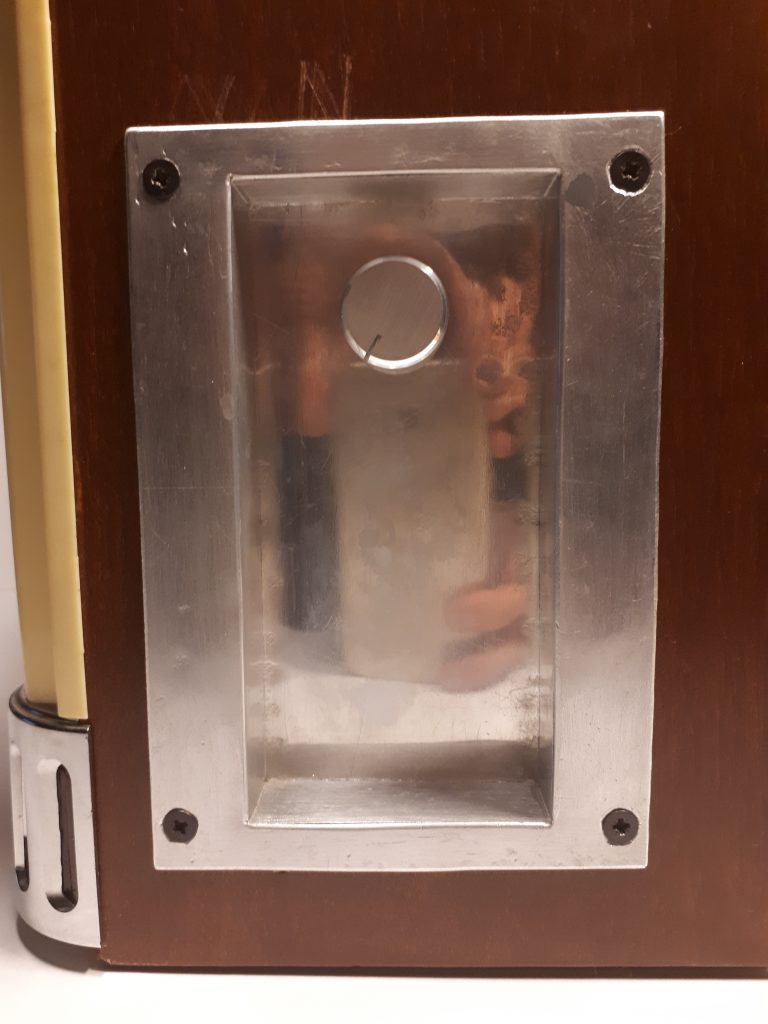
The amplifier will need a volume control and I wanted it to be fairly discrete, but easily accessible. There was a big rectangular hole in the side of the wooden case where the old cassette player used to be. I needed to fill this in, so I made a recessed aluminium control panel. I cut the aluminium pieces out and stuck them together with JB weld. This then mounted the volume control and has room for later additions if I need them.
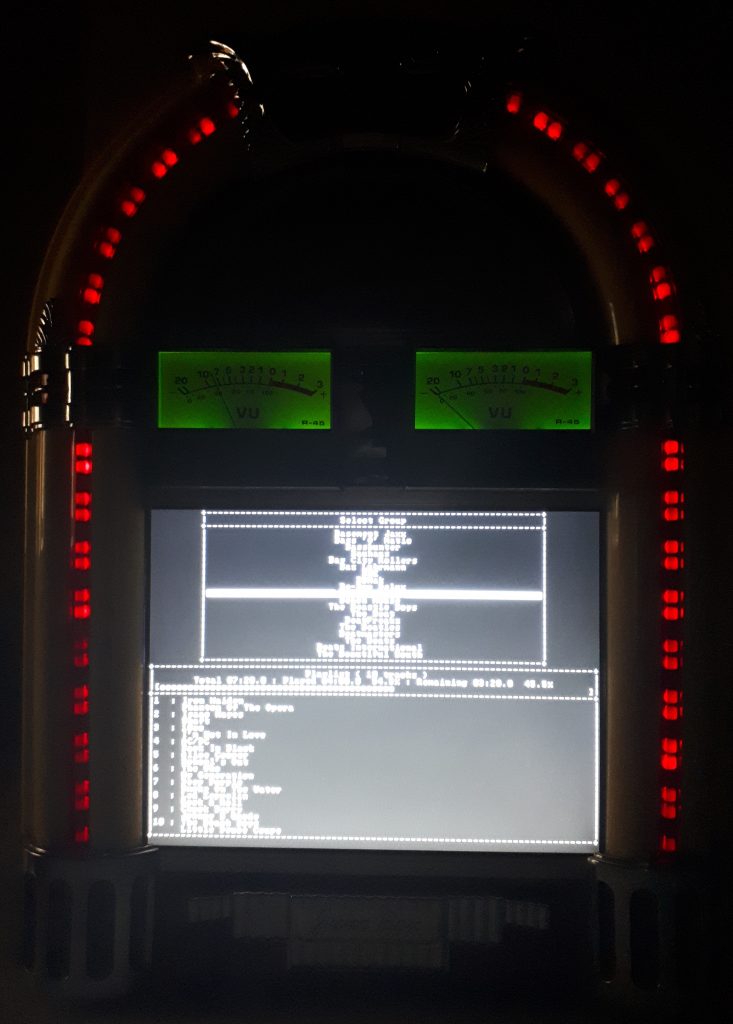
To complete the sound output, I fitted two old school VU meters to give a nice touch when the music is playing. I swapped their internal filament bulbs for green LED’s to increase their reliability.
How can I have the famous Wurlitzer bubbles?
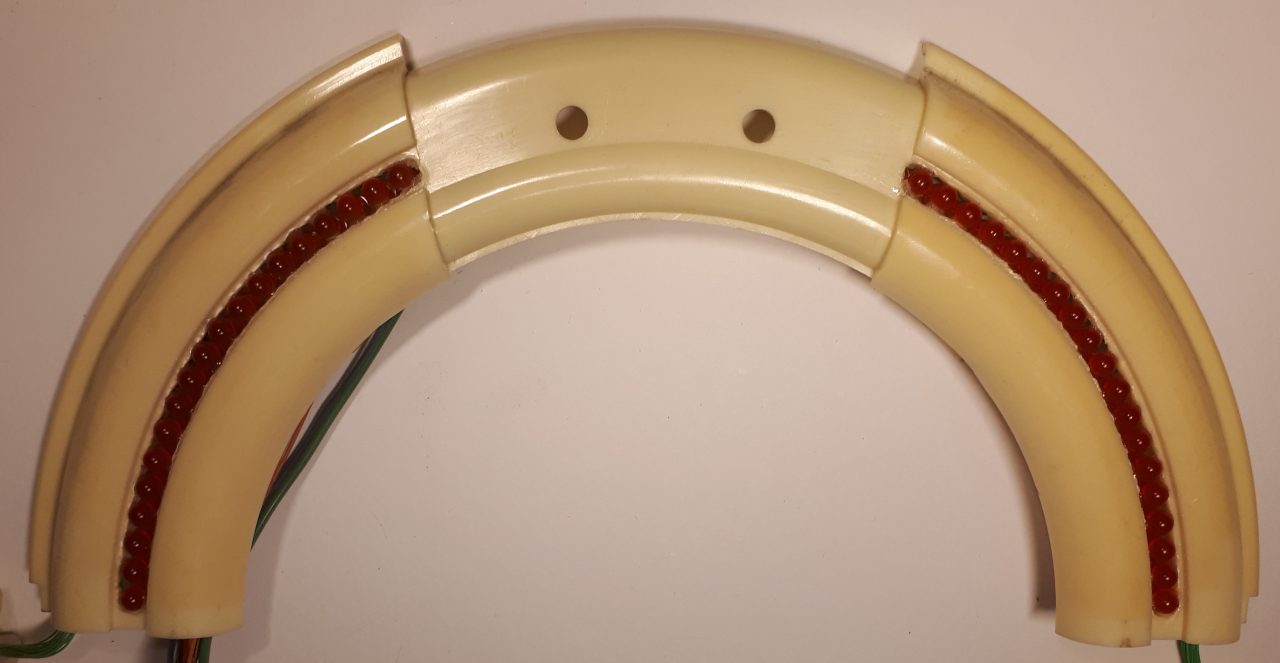
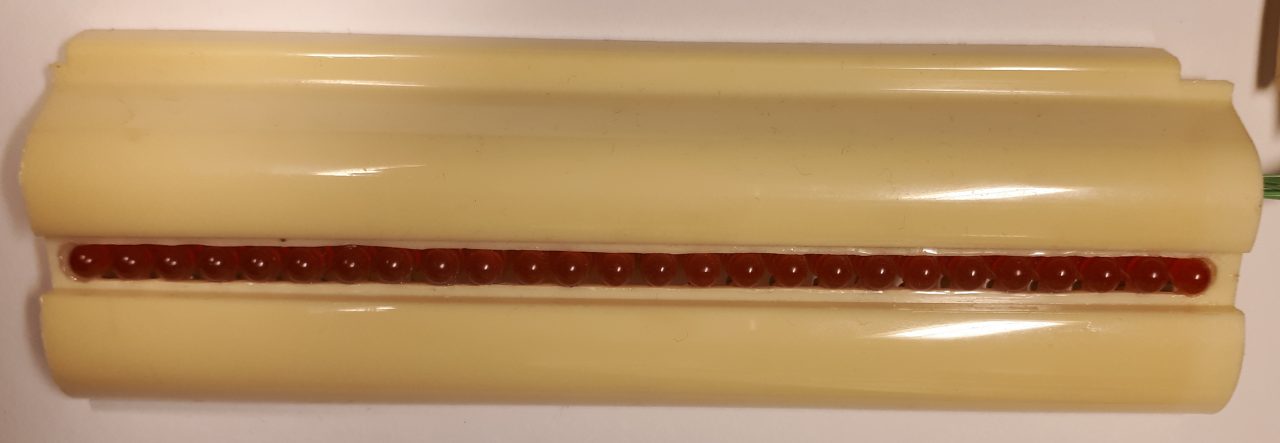
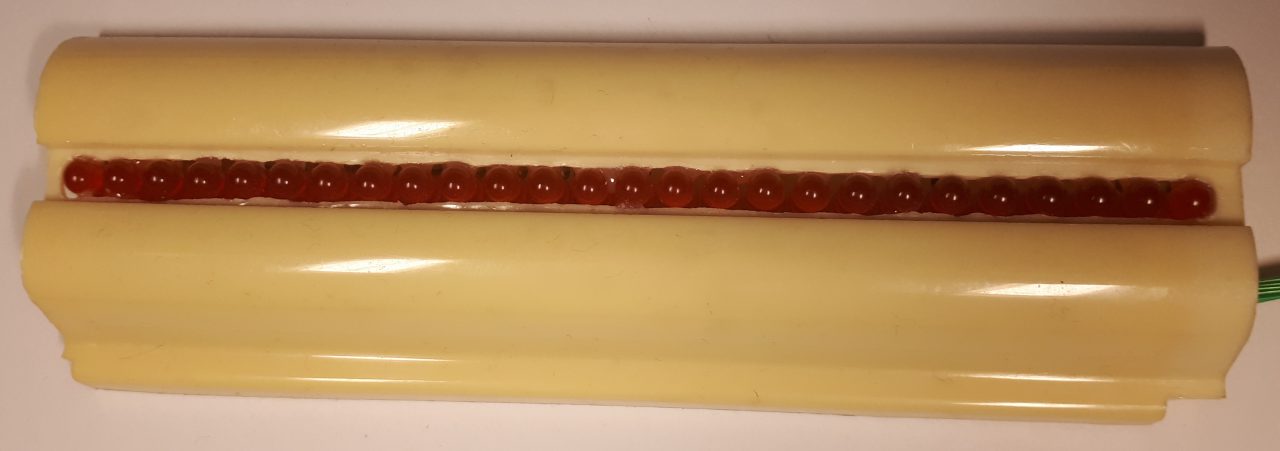
An original Wurlitzer jukebox has a trim around the edge of the front panel, and inside this trim there are clear back lit tubes with water in them. Bubbles rise up the tubes and this gives a nice effect while the jukebox is running. I wanted to try and emulate this on mine.
This mini jukebox also has a plastic trim around the edge of the front panel. And in the centre of this trim is a smaller clear red plastic strip. Originally behind this red plastic strip were bulbs every so often that just stayed on all the time. I wanted to do something a bit more special than this. So I put my thinking cap on.
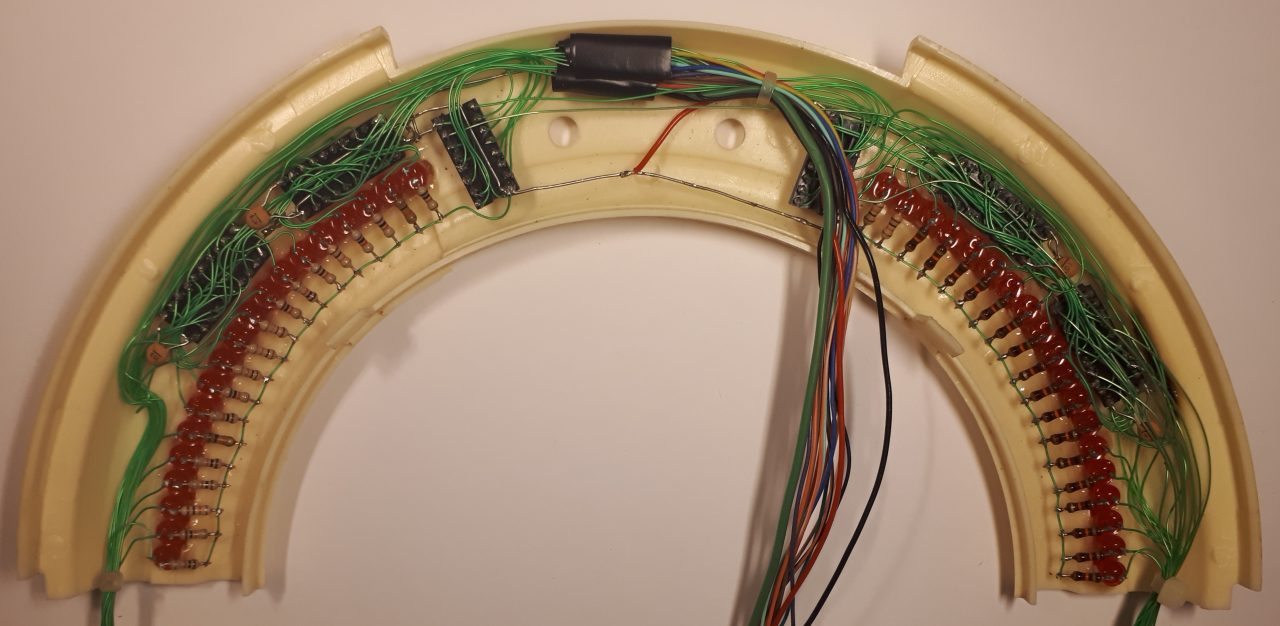
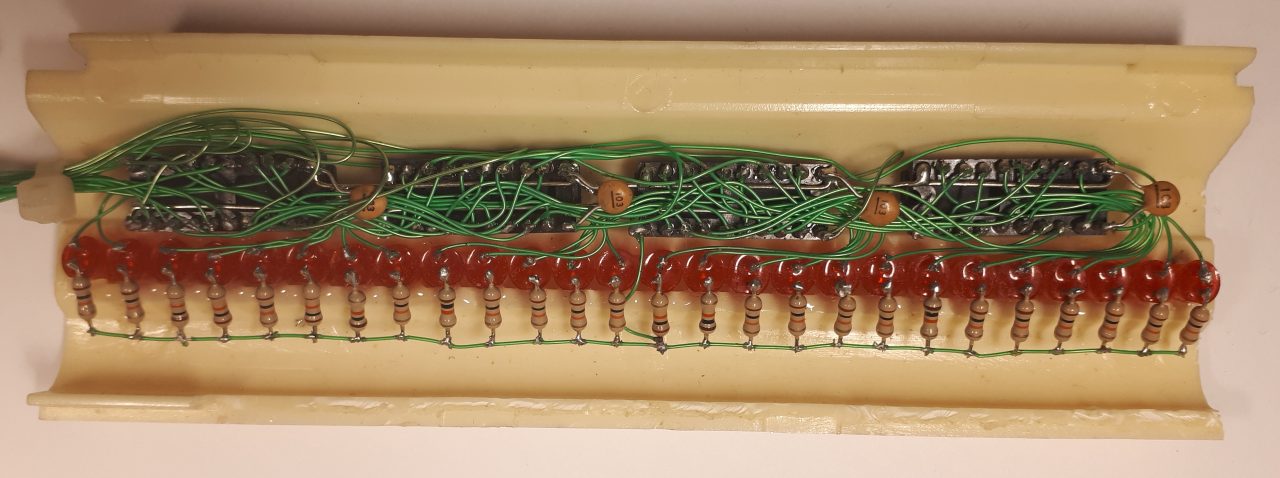
I came up with the idea of a line of LED’s behind the red plastic trim and controlled from the Mini-ITX motherboard. In total there are 90 LED’s and driven by 12 74HC374 8 bit latching buffer chips and using 2 74HC138 3 to 8 line decoder chips to select them. This is all driven from the parallel port. Each LED can be independently turned on and off. A daemon process reads a config file which contains all of the LED sequences and then plays then continuously.
If I was to do this again now I would have probably used 8 bit shift register chips daisy chained together. The end result would have been the same, but with less wiring.

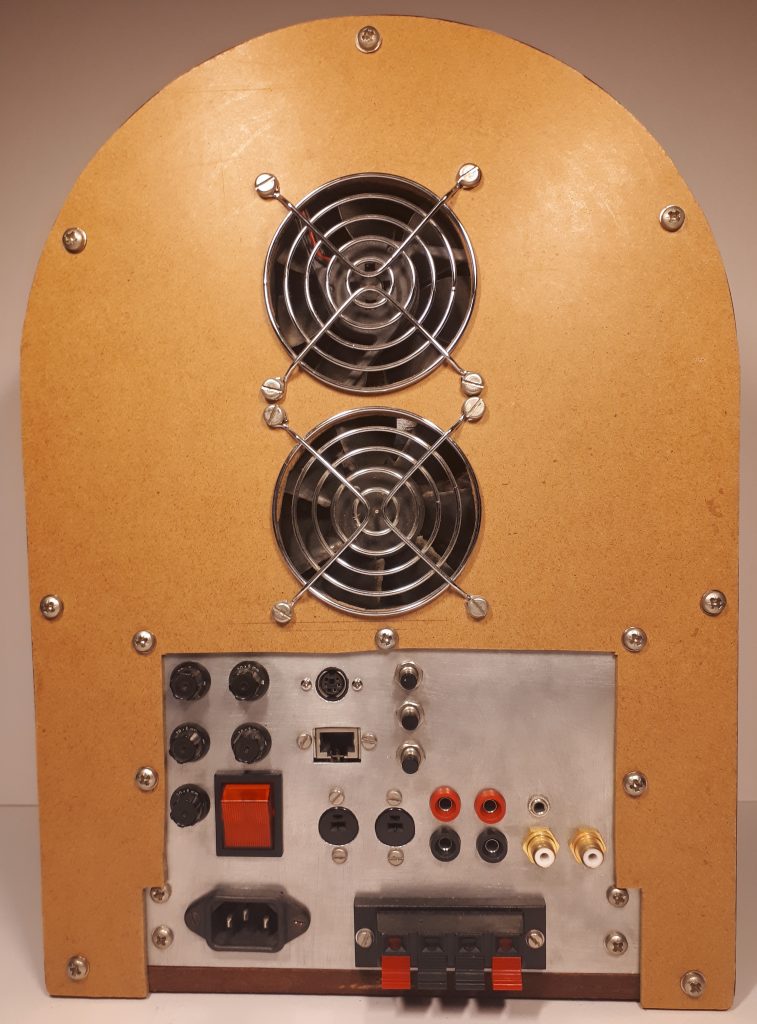
Miscellaneous wiring and rear panel
To get everything working and looking nice inside, there was a load of wiring needed. I like things to be neat and tidy as much as possible. I mounted power supplies for the amplifier, screen and PC in the bottom and sides. The amplifier power supply is the heaviest, so this is at the bottom to keep the centre of gravity low so it will not topple over.
A rear panel has all the connectors, buttons, etc on it as follows.
- Mains input.
- Mains switch.
- Fuses for the mains input, amplifier left and right power inputs and left and right speaker outputs.
- Buttons for the screen on / off, PC on / off and reset.
- Line out to connect to an external amplifier if needed.
- Speakers connections for bare wires and 2 different types of connectors.
- Ethernet network connector.
- PS2 keyboard.
Also the removable back of the jukebox houses two fans. One draws air in and the other draws air out to try and get some air circulation going.
Playing and selecting the music
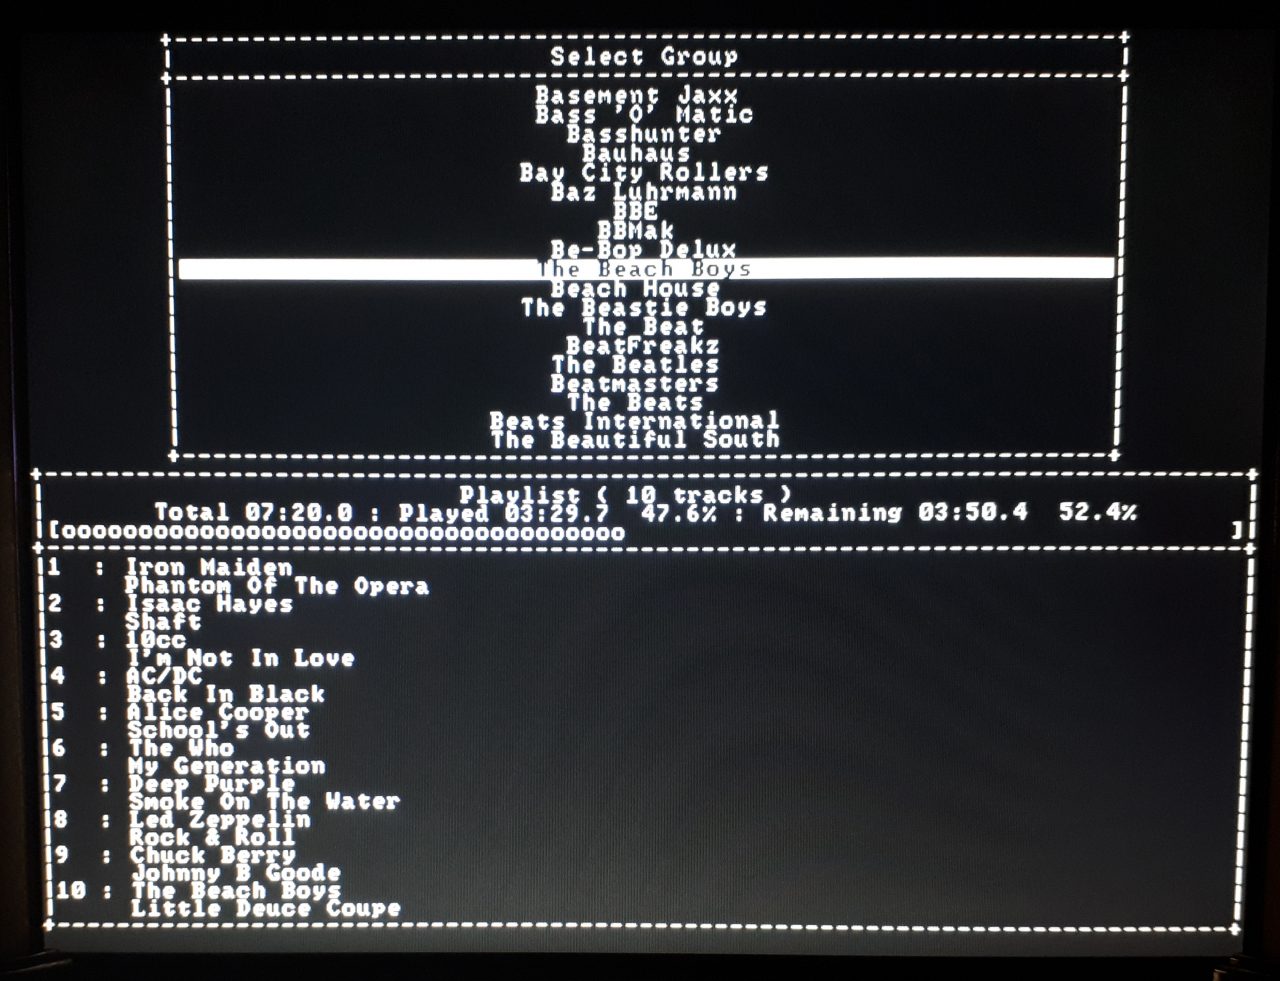
To control the jukebox, I would need some sort of menu system. Nothing that was already available suited my requirements, so I decided to write my own. With a career in software, this was not a problem.
A wanted the menu system to work as a client server system. I wanted a daemon server process to run in the background to handle the music queue and playing the current track. And I wanted a menu client system that would communicate with the server process with message queues. This meant the menu would be simple and the complexity would be in the server process.
The server process would also gather information about the music queue and the current playing track and write this to some shared memory. The menu system can then read the shared memory and display this information back to the user. So the user can then see the jukebox track queue, and information about the current playing track, like how long it is, how much has played, how much remaining, etc. The menu can also kill songs if a mistake has been made with a selection.
The server process will also compare newly selected tracks with the ones already in the queue. If a new track is already in the queue, then the new track selected is ignored as it is already scheduled. This stops someone from selecting a song and having it play many times in a row. The only way to repeat a song, is to allow the song in the queue to finish and to then select it again. This is no different to a real jukebox.
A mini PC keyboard controls the menu system and it sits in front of the jukebox. Unfortunately this was one thing I was not able to incorporate into the main case.
Using it at home and at parties
My jukebox is going to have two main uses at home and at parties. My home Hi-Fi, records and CD’s were all sold some time ago and I just keep my music collection as MP3’s now. I do not really get a lot of time to listen to music anymore, so using this suits me fine. Thus I can can turn it on at a moments notice and I have all my music to hand. I have never really been an audiophile, so I do not really care about how this will not be the best quality. It plays music really well and that is all that matters to me.
If I am doing something at home and I want some background music, then I can select a load of tracks on the menu and then let it play through them. I rarely had CD’s where the whole album was really good, so playing the whole CD was not something I would have done. So the jukebox works really well, as using my old Hi-Fi, I would have been swapping CD’s all the time. Now I can just choose the tracks I want and fill up an hour or so with ease.
Parties was also a big hit with this. Before, we would have a stereo and then a huge collection of CD’s. And it was almost a full time job for someone to keep swapping the CD’s to keep the music flowing. Again, full albums were never played. So my jukebox was a huge improvement. Different people could have a quick go and select a few tracks and before you knew it, you had an hour or so of music to get through. The only complaint was from people who have selected a track and then had to wait ages for it to play. But this is no different to a real jukebox anywhere else. And even if we were still using a Hi-Fi and CD’s, we would have prioritised peoples requests in the order they were made. So nothing is different in that respect.
People liked the ease of use and the styling of an old Wurlitzer jukebox. They also liked the LED light display and it added a nice touch while the music is playing. The menu system has lots of status data displayed on it and this nicely shows information about the current playing track and the next tracks in the queue.
It has not been used at parties for some time now, so it is debatable if more modern techniques have made it redundant. I like to think it is still relevant, and because of this, I still keep it updated with new music and filling gaps in the older music.
Future work
On the whole, I am very happy with this, but there are a few things I can think of to improve it.
- LED display. I have thought about using RGB LED’s instead of just red ones. This would involve more wiring and software changes, but it would give a nice colourful display.
- Menu system. Maybe improve it and bring it a bit more up to date. It is text based at the moment, so maybe change it to be graphical.
- Top window area. This has a plastic record player in it to emulate the look of the original jukebox. I would like to add some sort of LED lighting in there to liven it up a bit.
- Random play and music categories. A random play feature would be nice if you are not sure what to play. Music categories would be good to try and pin down a selection. Or Randon play within a music category to only have random tracks of a certain type.
- Music selection buttons. Try and work out how to have buttons on the main case so I do not need to have an external mini keyboard.
- Wi-fi for wireless updates and maintenance.
Is it still relevant anymore?
This was made before you could buy cheap computer boards like the Raspberry Pi and before music streaming was a thing. With all of this now my jukebox is sort of redundant. You could make a much small unit with a Raspberry Pi, or just use a smartphone or a tablet connected to a sound bar and using an online music streaming service.
For use at home, I do not really care about how a better, smaller, lighter unit could be made. I like this and it does what I want and has the look that I like. Music streaming has never really interested me as I like to have my own copies of stuff and not rely on someone else’s server to provide it.
At parties, i think my friends would be thinking like me and not be bothered about using something else or a streaming service with a tablet, etc. They like the fact that this is dead easy to use. Also, in the absence of an Internet connection, it will still work and only needs a mains socket.